E4X XML Cheat Sheet

Parsing XML is one of the major pain points in development. Without exact syntax you’re left scratching your head. After visiting the same collection of links over and over, I’ve decided to consolidate the more useful syntax into a single post. All examples can be used with both JavaScript and ActionScript as they are both based off of ECMAScript.

Problem:
E4x is great but it requires exact knowledge of the syntax. It’s easy to forget common functions if not used every day.

Solution:
This cheat sheet is a collection of examples from common XML structures. It’s meant to kick your brain back into gear after a few months without working in e4x. For a more comprehensive guide to XML and e4x please visit the links at the bottom of this post.

What is XML and e4x? I’ll let Wikipedia handle that one.

Step 1: Define XML

Here is a quick example on defining XML inline:

var data:XML = <data>
	<image>pirates.jpg</image>
</data>;
var data = <data>
	<image>pirates.jpg</image>
</data>;

The only difference is that the ActionScript variable is typed. The JS version will work in AS but typed variables are so much easier to work with. Code completion is my best friend.

OK, from here on out I’m just going to show the XML, trace statements and expected output. Everything is cast to a string for easy output.

Step 2: Access a node value

Using the XML above…

trace(String(data.image));

Output:
pirates.jpg
alert(String(data.image));

Strikingly similar, however, break points and trace statements are so much more fun than alerts.

Step 3: Access an attribute

<data>
	<image name="Pirate Image">pirates.jpg</image>
</data>
trace(String(data.image.@name));

Output:
Pirate Image

I assume by this point you can figure out the JS syntax. Writing JS is like eating squash. It’s good for you but why do it when there is free cake?

Step 4: Access a node value given an attribute key

<data>
	<image name="Pirate Image" id="p1">pirates.jpg</image>
	<image name="Pirate Image 2" id="p2">pirates2.jpg</image>
</data>
trace(String(data.image.(@id == "p2")));

Output:
pirates2.jpg

JavaScript developers are ActionScript developers, they just don’t know it yet.

Step 5: Access an attribute given an attribute key

Using the XML from step 4…

trace(String(data.image.(@id == "p2").@name));

Output:
Pirate Image 2

ActionScript and JavaScript are like two people that hate each other only to later find out that they are actually siblings with everything in common. They proceed to live happily ever after.

Step 6: Parse through nodes

<data>
	<image name="Pirate Image" id="p1">pirates.jpg</image>
	<image name="Flower Image" id="f1">flower.jpg</image>
	<image name="Car Image" id="c1">car.jpg</image>
</data>
for each(var img:XML in data.image)
{
	trace(String(img.@name));	
}

Output:
Pirate Image
Flower Image
Car Image

Just remove the typed variable, replace trace with print and your JS will be good to go. At this point you might want to start populating value objects with attributes, paths and id’s.

Additional resources:
http://www.republicofcode.com/tutorials/flash/as3xml/
http://www.senocular.com/flash/tutorials/as3withflashcs3/?page=4

JSON parsing cheat sheet coming soon!

Link Directly to the Mobile Android Market

With one line of code you can open up the mobile Android market from within your app! You can open the market to a specific application or to a page listing all of your apps. This is a great way to cross sell your applications and limit the number of clicks for a user to download your app.

Problem:
Linking to the Android market on a mobile web browser brings up a security warning saying “There are problems with the security certificate for this site.” This pop up is rather troublesome, who is actually going to click to continue? Even if they do the web interface doesn’t display very well on mobile devices. Let’s bypass this message all together and bring the user directly to the Android market app within the mobile device!

Solution:
Replace “https://market.android.com/” with “market://” for any valid market URL. It’s that easy! Just make sure to do this only within mobile applications. Desktop browsers and any other non-Android device will not know what to do with the “market://” preface. On the desktop use the standard URL and within mobile devices use the shorthand URL. This will ensure the best user experience for everyone and ensure the most downloads of your app.

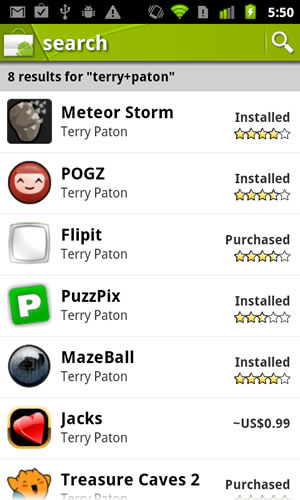
Use this line of code in your AIR for Android Apps to bring up a search result (example ‘terry paton’):
navigateToURL(new URLRequest(“market://search?q=terry+paton”));

or link directly to an app with this:
navigateToURL(new URLRequest(“market://details?id=air.com.terrypaton.tc2″));

Navigating to “https://market.android.com/…” on an Android brings up this message:
Security warning message.

However, navigating to “market://search?q=terry+paton” brings the user to the market!
Terry Paton on the Android Market

A big thanks to Terry Paton for working with me on my mobile marketing campaign. Make sure to check out all of his awesome AIR for Android games on the market:
https://market.android.com/search?q=terry+paton

Publishing Apps to iOS, Android and BlackBerry with AIR

Using Flash Builder Burrito and the Flash IDE you can export your ActionScript projects to three mobile platforms without any change in code! Let’s take a look at how to make this possible. Before we get started, here is a video with one of my demo apps running on all three devices:

Multi-screen:
The variety of screen resolutions and DPIs can be the hardest part of building a mobile app. When building an AIR app for mobile devices you have two important properties Capabilities.screenResolutionX(Y) and Capabilities.screenDPI. Using stage.stageWidth on mobile devices does not work the way you would expect it to. If you set up your application in Flash to have a width of 480 and a height of 800, the stageWidth and stageHeight will return these numbers even if the screen is smaller. Another thing to note is that the iOS packager currently targets 320×480 even though many of the iOS devices run 640×960. We’ll account for that by adding a screenResolution check.

In my application when a device has lower than 400 pixels in width I drop down the paint brush width. When the device has higher than 400 pixels I increase the size of the menu accordingly. A better approach would be to use the Capabilities.screenDPI for this calculation rather than just the screenResolution. All of your view components should be able to render at different DPIs and resolutions. When you know this from the start it is easy to build into the code. Here is an example:

if(Capabilities.screenResolutionX < 400){
	_canvas = new SimplePaint(Capabilities.screenResolutionX, Capabilities.screenResolutionY-85);
	_canvas.ratio = 0.66;
}else{
	_canvas = new SimplePaint(Capabilities.screenResolutionX, Capabilities.screenResolutionY-125);
	_menuBar.scaleX = _menuBar.scaleY = 1.5;
}

Notice how we are changing the size ratio of the brushes for smaller screens with a lower DPI. For larger screens we are increasing the size of the menu. This makes the application appear the same to the end user even when the app is running at 480×800 on the Android and 320×480 on the iOS! This could be improved to use the actual DPI value but the basic idea is there.

Multi-touch
This is the easy part. Use the Multitouch.maxTouchPoints to determine if the device supports touch. If it does than add touch listeners, if the device has 0 touch points add mouse event listeners. Don’t be that person that only codes for one device. With only a few extra lines of code you app will work on desktop and mobile. This also makes debugging much easier!

if(Multitouch.maxTouchPoints > 0){
	Multitouch.inputMode = MultitouchInputMode.TOUCH_POINT;
	_canvas.addEventListener(TouchEvent.TOUCH_BEGIN, onTouchBegin);
	_canvas.addEventListener(TouchEvent.TOUCH_MOVE, onTouchMove);
	_canvas.addEventListener(TouchEvent.TOUCH_END, onTouchEnd);
}else{
	_canvas.addEventListener(MouseEvent.MOUSE_DOWN, onMouseBegin);
	_canvas.addEventListener(MouseEvent.MOUSE_MOVE, onMyMouseMove);
	_canvas.addEventListener(MouseEvent.MOUSE_UP, onMouseEnd);
}

Wasn’t that easy? One thing to note is that TOUCH_END was not always dispatched, especially when you start using 3+ touch points. To work around this add a timer into your class that checks to see if a TOUCH_MOVE event has been called. The TOUCH_MOVE event is dispatched even when the user has stopped moving and only stops when the touch has ended. As a backup, check every half a second or so to make sure the specific touch point id is still moving.

Setup:
To setup your workspace to export to all three platforms you’ll need to create a ActionScript only Mobile project in Flash Builder Burrito. Create an FLA in the source folder that uses the runnable AS file as its base. Create your assets in the FLA file, export them into a SWC to be used for FB and mark them as run time compiled so they work with the Flash IDE. From here you can export to all three devices without changing any files. Life is good :)

Conclusion:
In just 17 lines of code and a little setup we’ve got our multi-screen, multi-touch application ready to go! Make sure to add your event listeners for Android to close the app when the user hits back or home. This entire painting application is less than 400 lines of code (~4KB compiled), was built from scratch in less than 12 hours and is easily maintainable across multiple platforms. Performance is great and native APIs are easy to use. My only complaints are that the file size for the iOS is rather large and the iOS exporter doesn’t support the Camera API yet. Outside of that, this is the best way to build cross platform apps.

Wet Paint on the Web:

Wet Paint Flash application.

Get Adobe Flash player

Porting to the web required changing 3 lines of code. To get these source files running on mobile devices change the _webMode value to false and remove the width / height from the SWF declaration. I also had to comment out the cacheAsBitmapMatrix to get it running on the web. Still very easy to convert!

Source files.

Enjoy!

Conflicts with Adobe Products and Windows 7

Is the Extension Manager failing to add extensions? Flash Builder unable to install add-ons? Acrobat 9 unable to auto update? Print to PDF freezing after 3 progress bars? The list continues… luckily there is a simple fix!

Problem:
By default, the Windows 7 notification system prevents software products from making changes to your computer. Normally applications would prompt you for access but in many cases Adobe products fail silently.

Solution:
In some cases you can right click on the application and select to run as administrator. This only fixes a handful of issues though. To completely resolve all of the issues you’ll need to disable the pesky notifications within Windows 7 all together. To do this, open your control panel, click on User Accounts and Family Safety, select User Accounts, click Change User Account Control settings and finally drag the slider down to the bottom. You will need administrative access to do this.

Keep in mind this change will allow all applications to make changes to your computer without your consent. In my opinion, this is a small price to pay for working software.

Enjoy!

List of known conflicts:
>Dreamweaver unable to install HTML5 extensions during auto update.
>Extension manager unable to install any extensions.
>Flash Builder unable to install plug-ins.
>Acrobat 9 Pro upgrade from 9.0 to 9.2 fails to update.
>Distiller Print to PDF fails in all versions.
>Any others?