Android Device Manager

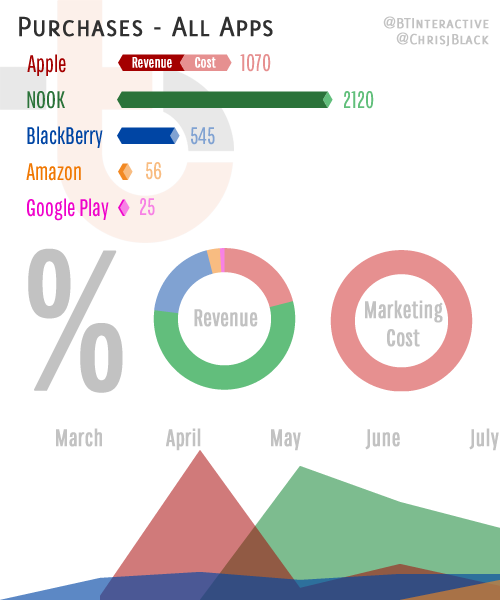
Use the new Android Device Manager to locate, ring your device or do a remote wipe. This website provided by Google is similar to the Find My iPhone service and requires initial set-up on your phone. I’ve known plenty of people that have lost phones and wished they had activated a service like this in advance. Log on today and set up your device.

https://www.google.com/android/devicemanager

The service doesn’t keep a history of your locations. Your device must be turned on and connected to the internet to work with the service. Here is a screen shot of the service in action:

Two

ActionBar with Android Support Library r18

Google recently released a new version of the Android Support Library (r18). They added a number of features. One of the biggest additions is support for the ActionBar back to 2.1 devices. In this post we’ll cover what you need to set up the new ActionBarActivity within your project. The sample code also shows how to integrate the DrawerLayout which was added in r13 of the support library.

With the addition of the Drawer and ActionBar to the support library, developing apps for 2.1+ devices is easier with fewer dependencies on third party libraries.
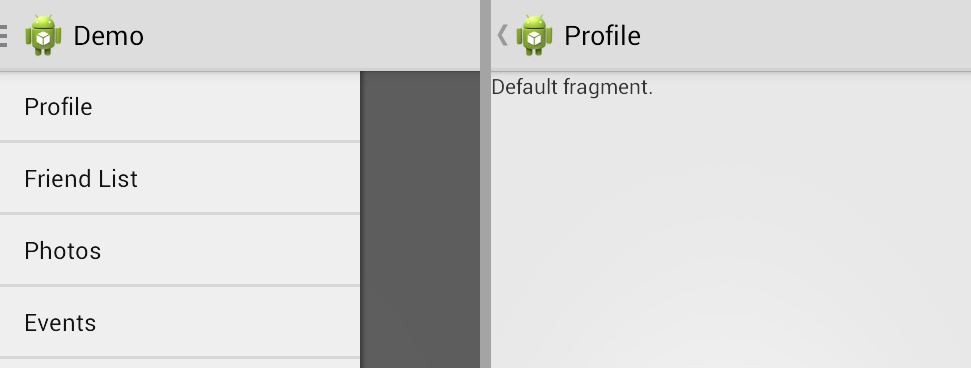
ActionBar with menu drawer screen shot.

Step 1: Setup Android Studio

First, download Android Studio. Next, open the SDK manager and download the latest Android Support Library and Android Support Repository. We’ll be using both v4 and v7 for this demo (step 2).

http://developer.android.com/sdk/installing/studio.html
http://developer.android.com/tools/support-library/setup.html#download

Make sure you are running the latest version of Android Studio (0.2.2+) and the latest version of Android (18.0.1+). Create a new project and continue to step 2.

Note: You can also include these libraries with Eclipse. Follow the instructions on the support library setup page for more information.

Step 2: Add Dependencies

Update your gradle.build file to include the following. If your gradle.build file is empty to start with, you’re editing the wrong file. Drill down into your project folder and find the gradle.build file with content in it.

buildscript {
    repositories {
        mavenCentral()
    }
    dependencies {
        classpath 'com.android.tools.build:gradle:0.5.+'
    }
}
apply plugin: 'android'

repositories {
    mavenCentral()
}

dependencies {
    compile 'com.android.support:support-v4:18.0.+'
    compile 'com.android.support:appcompat-v7:18.0.+'
}

android {
    compileSdkVersion 18
    buildToolsVersion "18.0.1"

    defaultConfig {
        minSdkVersion 7
        targetSdkVersion 18
    }
}

At this point your project should compile.

Step 3: Add the Support ActionBar

public class MainActivity extends ActionBarActivity {

    ...

    @Override
    protected void onCreate(Bundle savedInstanceState) {
        super.onCreate(savedInstanceState);
        setContentView(R.layout.activity_main);

        ...

        getSupportActionBar().setDisplayHomeAsUpEnabled(true);
        getSupportActionBar().setHomeButtonEnabled(true);

        ...

    }

Make sure to use the theme AppCompat or use a custom theme that inherits from AppCompat. If you don’t, you will get the following error: “must have a theme which inherits from Theme.AppCompat.”

    <application
        android:allowBackup="true"
        android:icon="@drawable/ic_launcher"
        android:label="@string/app_name"
        android:theme="@style/Theme.AppCompat" >

Step 4: Style the ActionBar

You can use this website to help generate a theme based on AppCompat. Make sure to select AppCompat from the style compatibility drop down.

Keep in mind styles generated with that tool do not impact the styling of the ViewPager. ActionBar tabs may look similar to the ViewPager but they require a separate set of styles. More information can be found here.

Source Code:

Full source code to an example project built with Android Studio can be found here.
Invalidate Options Menu with ActionBarActivity

Problem:

The latest support library (r18) brings ActionBar support all the way back to Android 2.1 (API level 7) but the invalidateOptionsMenu function is only supported in API 11 and higher. If you want to hide an icon or change the look of the menu, your app needs to refresh the options menu.

Android ActionBar with options menu.

Android ActionBar with options menu.

Solution:

Call supportInvalidateOptionsMenu() within your ActionBarActivity class or within your Fragment by calling getActivity().supportInvalidateOptionsMenu(). This function allows you to invalidate the options menu. More information about support library functionality for the ActionBarActivity can be found here:

ActionBarActivity API Documentation

I’ve implemented the new ActionBarActivity on my current project and have been very happy with the performance and functionality. It was an easy transition from using ActionBarSherlock. The biggest difference is with some of the support library functions and with the theme. Luckily, the ActionBar style generator has already been updated to use the new AppCompat theme!

ActionBar Style Generator

Selling Your Apps Part 1: Sales Summary

Where should you sell your apps? What revenue can you expect as an independent developer or start up company? In this blog series, I’ll be sharing Blacktop Interactive’s app sales across five different markets. To start we’ll be covering a summary of all paid app sales.

Background

I started Blacktop Interactive, LLC a few years ago but shifted focus towards apps in February of 2012. With the help of a couple interns we produced seven apps and have three more on the way. We have kids apps, painting apps, game boards and a recipe box on the way.

Summary

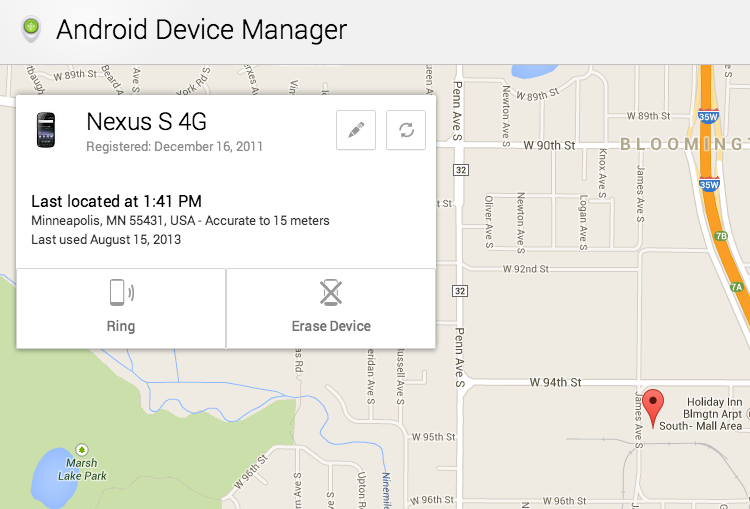
The info graph below does a great job of describing each of the markets. iOS is the only market we’ve spent marketing dollars on. We’ve found that specifically targeted ads tend to generate almost as much revenue as they cost but don’t scale well. The absolute best thing for apps is to be featured in each specific market. BlackBerry and Amazon both have request forms that developers can fill out for a chance to be featured. With Apple and Google Play, you must depend on ads or hope that they will hand pick your app out of millions to be featured. The NOOK Color is a very under saturated market (few apps compared to the number of users) and we’ve found that marketing is not required for a quality app to be successful.

Note that the BlackBerry sales are lower than Apple and NOOK but are very consistent. Apple has a VERY quick drop off from the top new apps list. NOOK has a slower drop off but has significantly higher sales, making up over 50% of the total revenue. The ‘new’ app list in Google Play is filled with preferred developers and existing hits. Good luck getting on that list. I filled out a request form with Amazon to be featured, they included our app in a mailing within a month. BlackBerry generally responds with app features in that time frame. You will have to pass quality control and have positive ratings to be considered for BlackBerry and Amazon featured lists.

Profit or Loss?

Right now we’ve invested more money into the apps than we’ve made back. The good news is that sales still seem pretty consistent. Over the next couple months we’ll be releasing more data on expenses vs. profit.

If you like our apps, make sure to checkout Blacktop Interactive on Facebook.