Building a Custom Android Keyboard

Problem

Google’s sample keyboard project is a little out of date. It’s a very helpful starting point but requires some minor changes to get it working as expected. On top of that, many of the common customizations are spread out across a wide array of stack overflow posts.

Solution

I’ve made some minor updates to Google’s base keyboard example and applied some of the common customizations to the keyboard. This only took a couple of hours to put together but required a number of different resources including blogs, documentation and Stackoverflow. This keyboard contains styling, predictive complete spell check and alternate keys. There is still a lot of room for improvement but this is a much better starting point.
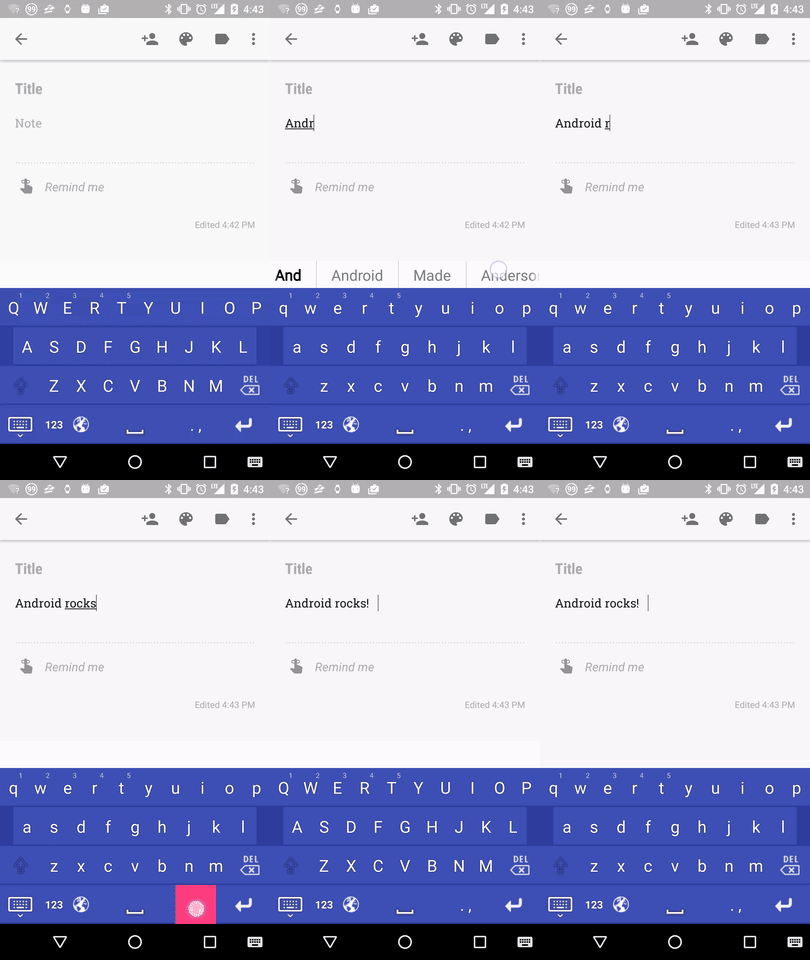
Keyboard animation

Source Code

Overview

There are already resources that walk through aspects of the keyboard code in great detail. At a high level you have a class that extends Keyboard, a KeyboardView and a KeyboardService that extends InputMethodService. On top of that it’s really just adding your icons, layout and XML files. Most of the styling can be done in the input.xml file.

Popup Keyboard Layout:

When you add pop-up keys (alternate keys that appear on long press) you’re actually creating a new keyboard for the pop-up. It was a bit confusing at first but makes sense after you take a look at the code. The new keyboard is automatically created and displayed as a modal above your existing keyboard.
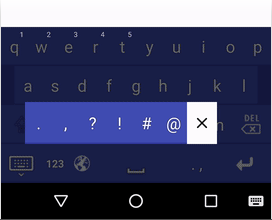
Popup Keyboard

Snipet from original keyboard XML template:

...
<Key android:codes="46,44" android:keyLabel=". ,"
     android:keyWidth="15%p" android:popupCharacters=".,?!#@" 
     android:popupKeyboard="@xml/keyboard_popup_template"/>
...

Popup keyboard XML template:

<?xml version="1.0" encoding="utf-8"?>
<Keyboard xmlns:android="http://schemas.android.com/apk/res/android"
    android:keyWidth="10%p"
    android:horizontalGap="0px"
    android:verticalGap="0px"
    android:keyHeight="56dp">
</Keyboard>

Popup keyboard layout file (set in the input.xml keyboard layout):

<?xml version="1.0" encoding="utf-8"?>
<LinearLayout
    xmlns:android="http://schemas.android.com/apk/res/android"
    android:layout_width="match_parent"
    android:layout_height="wrap_content"
    android:orientation="horizontal"
    android:background="@color/colorPrimaryDark">
    <android.inputmethodservice.KeyboardView
        android:id="@android:id/keyboardView"
        android:layout_width="match_parent"
        android:layout_height="wrap_content"
        android:keyPreviewLayout="@layout/preview"
        android:popupLayout="@layout/keyboard_popup_layout"
        android:keyBackground="@drawable/key_background"
        android:keyTextColor="#333"
        android:background="@color/colorPrimaryDark"
        android:keyTextSize="22sp"/>
    <ImageButton android:id="@android:id/closeButton"
        android:background="@android:color/transparent"
        android:layout_width="wrap_content"
        android:layout_height="wrap_content"
        android:layout_gravity="center"
        android:layout_marginStart="8dp"
        android:layout_marginEnd="8dp"
        android:clickable="true"
        android:src="@drawable/ic_close_black" />
</LinearLayout>

Next Steps

The predictive text appears over the top of content on the screen. I’ve been reading that it’s easier to manage by including it in the keyboard layout instead of using the candidates view. This would give more control over the behavior and prevent content on the screen from being covered up. In addition to that, predictive text doesn’t work correctly if you hit backspace half way through a word. The text selection position should be updated to check for white space and more intelligently select the word. This implementation uses the dictionary which seemed like a reasonable predictive text option but it could be updated to include a app specific dictionary of words that builds up over time.

I’ve removed the preview text in this example (the semi-transparent pop-up that appears just above the letter as you type). The pop-up was animating around the screen and not behaving like the new Android material keyboard. It didn’t look easy to modify this in the KeyboardView, it would probably be better to write this logic from scratch if you need it.

Resources

Getting Started:
https://developer.android.com/guide/topics/text/creating-input-method.html
http://www.fampennings.nl/maarten/android/09keyboard/index.htm

Sample Code:
https://android.googlesource.com/platform/development/+/master/samples/SoftKeyboard/
https://github.com/blackcj/AndroidCustomKeyboard

Spell Checker:
https://android.googlesource.com/platform/development/+/master/samples/SpellChecker/HelloSpellChecker/src/com/example/android/hellospellchecker/HelloSpellCheckerActivity.java
https://developer.android.com/guide/topics/text/spell-checker-framework.html

Other:
https://github.com/zeuxisoo/android-emoji-keyboard
https://stackoverflow.com/questions/7752580/creating-a-softkeyboard-with-multiple-alternate-characters-per-key

Stackoverflow Posts:
https://stackoverflow.com/questions/30654687/how-can-i-show-the-candidates-view-under-the-android-soft-keyboard
https://stackoverflow.com/questions/18180136/how-to-change-background-color-or-theme-of-keys-dynamically-in-custom-keyboard-a
https://stackoverflow.com/questions/17714172/how-to-change-key-background-of-any-key-in-android-soft-keyboard
https://stackoverflow.com/questions/9996968/hide-android-keyboard-key-preview
https://stackoverflow.com/questions/2888896/add-words-to-androids-userdictionary
Getting Started with Bitrise.io

Problem:

Most automated build servers don’t play well with mobile apps. Even after considerable configuration they still require a lot of up work for each new app.

Solution:

A friend of mine recently introduced me to Bitrise.io, an automated build server specifically built for mobile (Android, iOS & Xamarin). I’m happy to say that I was up and running in less than 30 minutes. With set up complete, adding a second project took just minutes.

Why do you need a build server?

Build servers are very useful and help ensure the stability of your codebase. If you’re code doesn’t compile or you forgot to check in a necessary resource to version control, your build server will notify you that something is wrong. Build servers also allow you to automate builds for QA and will keep a record of release builds. Still not convinced? Check out this blog.

Adding Your First Android Project to Bitrise.io

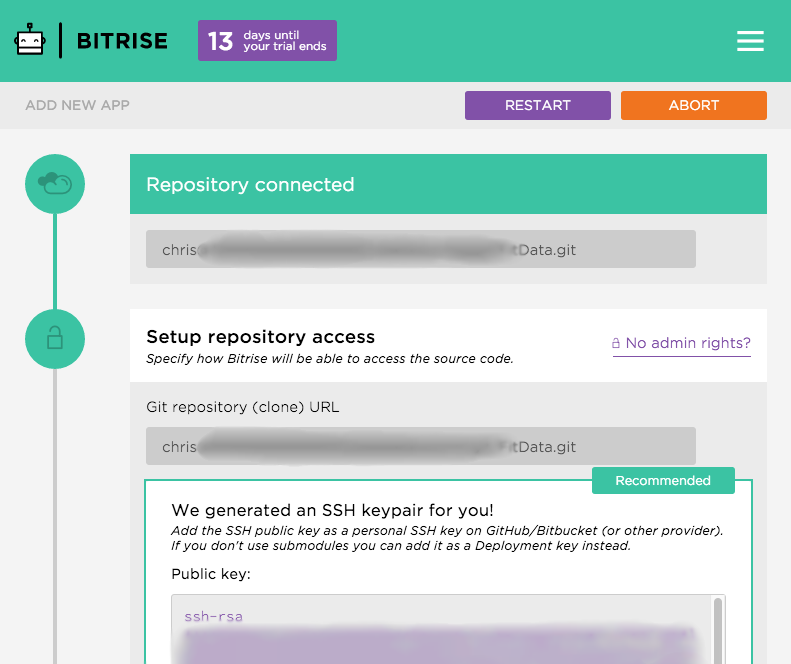
You can easily hook Bitrise.io up to your existing GitHub or Bitbucket account. If you host your own Git server, setup is as simple as adding an SSH key to your authorized_keys file.

Repo Setup

After you’ve added the SSH key as a new line to your authorized_keys file, select the branch you want to use. Select a stable branch that builds successfully on your local machine.

Repo Setup

I ran into a hiccup at this point. The project I added was one that I created almost a year ago. The gradle wrapper was too old to work with Bitrise.io and the error was a bit cryptic.

* What went wrong:
A problem occurred evaluating project ':app'.
> Failed to apply plugin [id 'com.android.application']
   > Gradle version 2.2 is required. Current version is 2.10.
     If using the gradle wrapper, try editing the distributionUrl
     in /bitrise/src/gradle/wrapper/gradle-wrapper.properties to
     gradle-2.2-all.zip

I was using version 2.2.1 and the current version is 2.8 so I’m not sure what the numbers in the error actually represent. A quick Stack Overflow search yielded the following result.

The solution

Update your graddle-wrapper.properties file:

distributionUrl=https\://services.gradle.org/distributions/gradle-2.2.1-all.zip
distributionUrl=https\://services.gradle.org/distributions/gradle-2.8-all.zip

I also updated to gradle 1.5 in my build.gradle file for good measure:

classpath ‘com.android.tools.build:gradle:1.2.3′
classpath ‘com.android.tools.build:gradle:1.5.0′

After checking in the code, everything compiled successfully! My ScoreKeeper app for Android Wear is now set up on Bitrise.io.

Android News for June 2015

Android Design Support Library

The design support library makes it easy to use material design when building Android apps. The best part, it’s compatible all the way back to Android 2.1. This support library includes a better navigation drawer, collapsing navigation bars, snack bars and a number of other key components of material design. Combine this with a view pager, recycler view and the swipe to refresh library for a complete base application.

Google developer blog:
http://android-developers.blogspot.com/2015/05/android-design-support-library.html

Sample code:
https://github.com/blackcj/DesignSupportExample

Developing for Android: Technical Guide

Google released a collection of best practices and common pitfalls written by the Android framework and runtime teams. This is a must read for all Android developers. It’s only eight chapters long so you have no excuse not to read it.

https://medium.com/google-developers/developing-for-android-introduction-5345b451567c

Free Material Design Icons

Need icons for your Android, iOS or Web app? Google has provided a great collection of icons that are free to use:

https://google.github.io/material-design-icons/
https://www.google.com/design/icons/

Stay tuned for more Android news and examples.

Cell Number Formatting with Google Apps Script

Problem:

The setNumberFormat function within Google Apps Script is not well documented in the API reference documentation. This function accepts a wide range of parameters in a single string that can be used to specify the format for a range of cells. Knowing the accepted formats will give you control over the data in your cells when using Google Apps Script for Google Sheets.

Solution:

The following examples demonstrate how to use various string patterns to define the format of a particular range within your active spreadsheet. You can set the formatting of a single cell, a whole column starting from a specific cell or an entire spreadsheet. Additional resources can be found on the Google Sheet support page for number formats. It would be nice if there was a link to that support page from within the API reference.

Plain text for a single cell:

// Use these first two lines for all four examples
var ss = SpreadsheetApp.getActiveSpreadsheet();
var sheet = ss.getSheets()[0];

// Single cell
var cell = sheet.getRange("B2");

// Plain text
cell.setNumberFormat("@");

Date for single column

// Single column, select every row from 2..n in column B
// To select a limited range put the ending row number (“B2:B10”)
var column = sheet.getRange("B2:B");

// Simple date format
column.setNumberFormat("M/d/yy");

Additional details about accepted date formats can be found here: http://docs.oracle.com/javase/7/docs/api/java/text/SimpleDateFormat.html

Currency for entire sheet:

// Select all rows and columns from a spreadsheet
var range = sheet.getRange(1, 1, sheet.getMaxRows(), sheet.getMaxColumns());

// Money format
range.setNumberFormat("$#,##0.00;$(#,##0.00)");

Additional currency and number formats can be found here: https://support.google.com/docs/answer/56470. You can specify up to four parts for custom number formats; positive, negative, zero and text. You can even add color by including one of the compatible colors in the string format.

Custom number format with color

// Number format with color
var row = sheet.getRange("A1:D1");
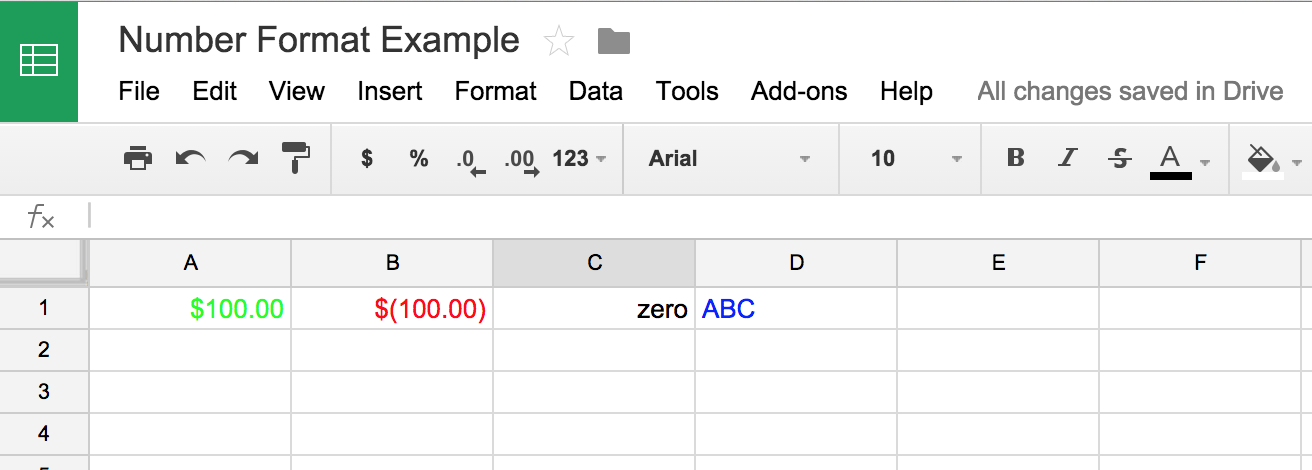
row.setNumberFormat('$#,##0.00[green];$(#,##0.00)[red];"zero";@[blue]');

// Sample values
var values = [
   [ "100.0", "-100.0", "0", "ABC" ],
];
row.setValues(values);

Number format example with color.

This gives you a quick way to set conditional formatting without having to write custom logic. You can use this to quickly identify problematic data.